
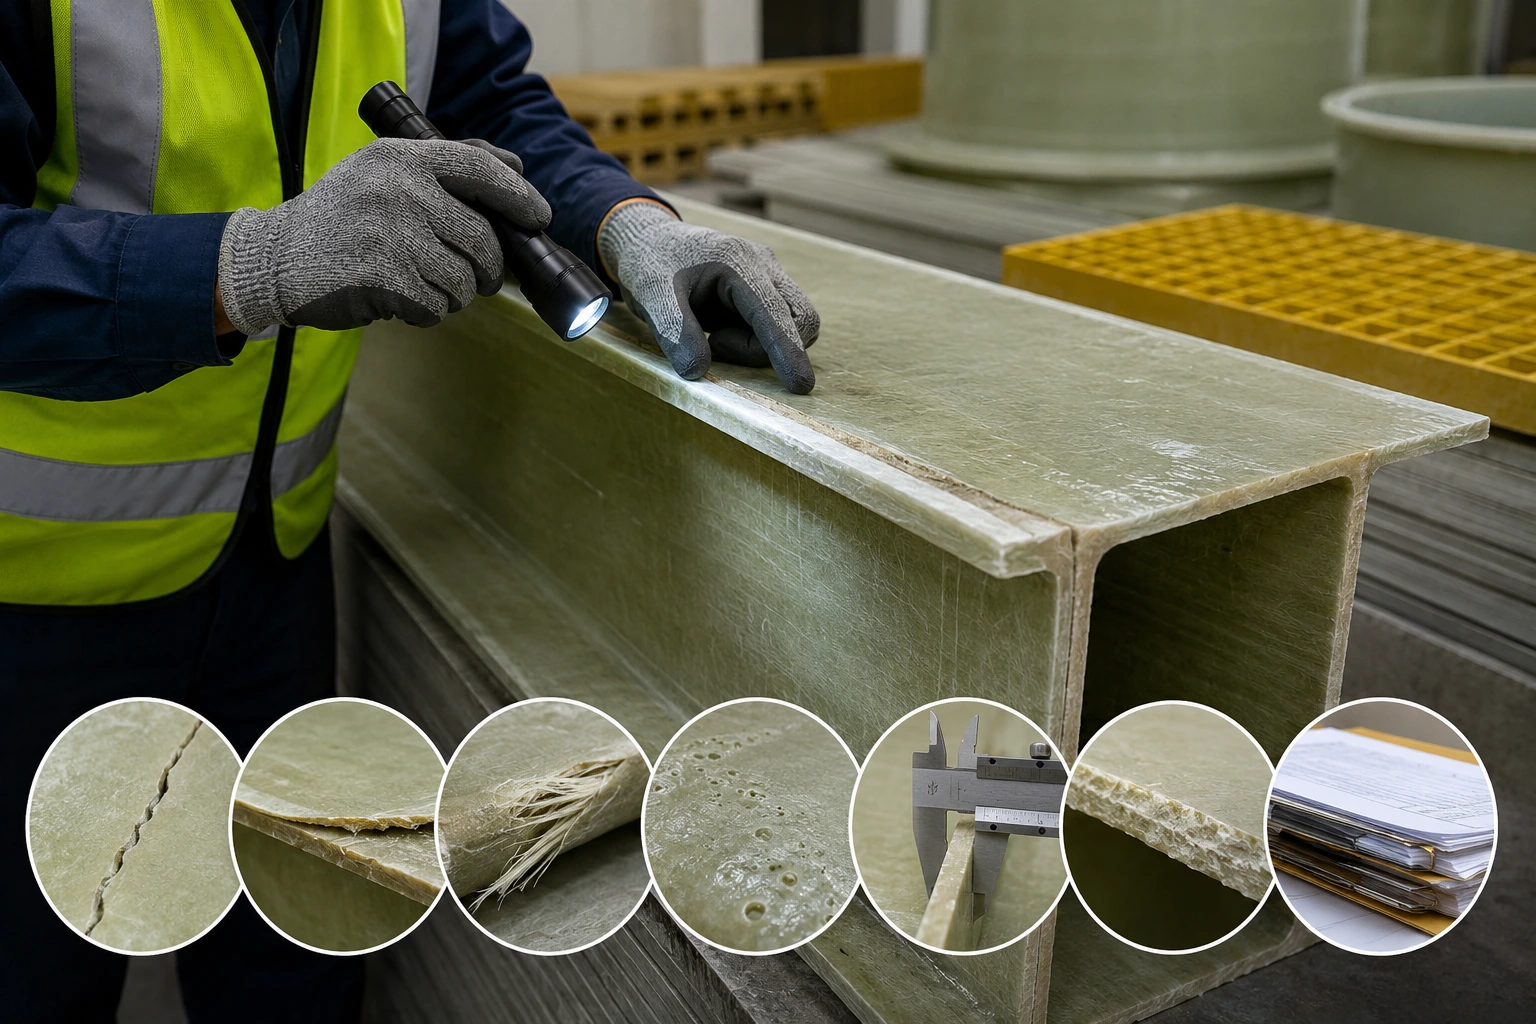
7 Signs Your FRP Product Will Fail Before Installation
Will your new FRP product survive the trip from the delivery truck to the finished structure? That one question decides whether your project stays on schedule or turns into a costly rework. FRP quality inspection is the step most teams skip when a shipment looks fine at first glance, and that is exactly when hidden problems slip through. This guide explains how to check FRP quality before installation, one warning sign at a time.
FRP (fiber-reinforced polymer) products get picked for their strength, corrosion resistance, and long service life. But poor manufacturing, the wrong resin-to-fiber ratio, rough handling, or a small dimension error can work against all three benefits. Many of these problems are visible before installation, if you know exactly where to look.
Quick answer: The clearest warning signs are visible cracks, delamination between layers, exposed or broken fibers, voids or resin-rich patches, incorrect thickness or dimensions, poor surface finish, and missing test documentation. FRP quality inspection catches most of these issues before the product ever leaves the yard.
1. Visible Cracks, Splits or Surface Damage
Cracks rank among the most common fiberglass defects found during pre-shipment checks, yet many buyers only look at the front face and miss the edges. A full inspection at delivery takes minutes and can save weeks of downtime later.
What to look for
- Hairline cracks on flat surfaces
- Deep cracks near stress points
- Splits around cut edges
- Impact marks or dented corners
- Damage around drilled holes or fittings
Cracks often point to a manufacturing defect or rough handling during transport. Once a crack opens the laminate, moisture and chemicals can seep in and weaken the structure from the inside. A crack near a connection point is riskier still, since that spot carries load once the part is installed.
Check surfaces, edges, corners, and joints under good lighting. A flashlight held at a low angle makes small cracks show up faster than overhead light alone.
2. Delamination or Poor Bonding Between Layers
Delamination is the separation of layers inside an FRP laminate, and it rarely announces itself with a loud sound. A soft spot under your thumb is often the first clue.
Warning signs
- Blisters or small bumps on the surface
- Bulging areas that feel hollow
- Soft spots when pressed
- Visible gaps between layers at the edge
- Uneven color patches over one section
Delamination lowers structural strength and tends to spread once mechanical or environmental stress hits it. It usually points to a bonding problem during lay-up or an early production issue that never got caught.
A visual scan catches most delamination, but a light tap test can help confirm a hollow-sounding spot. For structural parts, non-destructive testing (NDT) methods such as ultrasonic scanning give a more reliable result than tapping alone.
3. Exposed, Broken or Misaligned Fibers
Fiber strands do most of the heavy lifting inside an FRP part, so any damage to them changes how much load the product can safely carry.
What to inspect
- Glass fibers poking through the resin surface
- Broken or frayed fiber strands
- Fiber bundles visible where resin coverage is thin
- Uneven fiber spread across a panel
- Poor fiber alignment along the length
A slightly textured surface is not automatically a problem, since some manufacturing methods leave a natural fiber pattern behind. The real concern is fiber that is exposed, broken, or poorly soaked in resin, since that lowers stiffness and durability. Compare the surface against a known-good sample if you are unsure, or ask the supplier for reference photos before flagging it as one of the fiberglass defects on your report.
4. Voids, Bubbles or Resin-Rich Areas
Voids and resin pockets hide easily under a shiny gel coat, which is why a purely visual check sometimes misses them.
Common visual indicators
- Small air bubbles trapped near the surface
- Pinholes scattered across a panel
- Resin pockets with no fiber underneath
- Patchy or uneven resin color
- Areas that look slightly porous or sponge-like
Poor resin flow during lay-up or incomplete consolidation creates these gaps, and they can lower moisture resistance and long-term strength. Not every visible bubble means the part must be rejected – acceptance depends on the product specification and the standard that applies to that part.
Start with a visual scan, then check laminate thickness in the affected zone. For parts used in demanding environments, ask for additional test data before sign-off.
5. Inconsistent Thickness or Incorrect Dimensions
A part can look flawless and still fail to fit. This is where FRP quality inspection earns its keep, because dimension errors rarely show up until installation day.
Check:
- Overall length, width, and height
- Wall or laminate thickness
- Hole positions and spacing
- Angles and flatness
- Connection point alignment
- Tolerances listed on the approved drawing
A product can pass every visual check and still be unusable if it does not match the drawing. Measure with calipers or a tape measure and compare the numbers against the approved drawing, the purchase order, and the manufacturer’s technical sheet. Any gap larger than the allowed tolerance is a valid reason to hold the shipment.
6. Poor Surface Finish or Incorrect Gel Coat
Gel coat is the outer layer that protects an FRP part from the environment, so a poor finish is rarely just a cosmetic issue.
Signs
- Uneven or patchy gel coat
- Peeling or flaking sections
- Blisters under the top layer
- Color that does not match the sample
- Rough patches or visible contamination
Depending on where the part will sit, gel coat quality affects chemical resistance, UV protection, how easy the surface is to clean, and how the part looks after a year in service. Two products from different projects can carry different acceptable finishes, so judge the surface against the agreed specification rather than personal taste.
7. Missing Documentation, Test Reports or Traceability
Most articles on FRP defects stop at physical damage, but paperwork gaps cause just as many installation headaches. Quality is not only what your eyes can see on the surface.
Before installation, ask the supplier for:
- Material certificates
- Inspection reports
- Test certificates
- Dimensional inspection records
- Batch or lot identification
- Product specification sheets
- Compliance documents for the relevant standard
Without these records, you cannot confirm the part matches the approved drawing or the required performance level. ASTM D2563, the standard practice for classifying visual defects in glass-reinforced plastic laminate parts, is one document a supplier may reference during inspection – it groups 28 defect types into three acceptance levels (KTA-Tator, 2019, kta.com).
Not every FRP product needs the same paperwork. Requirements shift with the product type, the application, and the project specification, so check your contract before rejecting a shipment over a missing form.
How to Check FRP Quality Before Installation
Once you know the seven warning signs, the next step is turning them into a routine you can repeat on every shipment. This checklist covers how to check FRP quality in under ten minutes for most standard parts.
7-point inspection checklist
| Inspection Item | What to Check |
| Surface | Cracks, scratches, impact damage |
| Laminate | Delamination, bubbles, voids |
| Fibers | Exposure, breakage, poor impregnation |
| Dimensions | Thickness, length, width, hole positions |
| Finish | Gel coat, peeling, blistering |
| Fit | Alignment and connection points |
| Documents | Certificates, reports, and traceability |
Following this FRP quality inspection routine on every batch, not just the ones that look suspicious, keeps the process consistent from one delivery to the next. If a defect affects structural strength, dimensions, performance, or specification compliance, hold the installation until the issue is checked and resolved.
What to Do If You Find an FRP Defect Before Installation
Finding a defect before installation is actually good news – it means you caught the problem while it was still cheap to fix. Here is the sequence that keeps the process smooth.
- Photograph and document the defect
- Record the product, batch, and part number
- Compare the part against the approved drawing and specification
- Notify the supplier or manufacturer
- Ask for a technical evaluation or corrective action
- Repair or replace only when technically approved
- Reinspect before moving to installation
Skip on-site repairs for structural or chemical-service parts unless an approved repair procedure and a technical assessment back it up. For projects requiring professional FRP fabrication and installation services, working with an experienced technical team can help ensure the product is assessed and handled correctly before installation
Final Takeaway: Inspect FRP Before It Becomes an Installation Problem
A part that looks fine from three feet away can still carry hidden cracks, layer separation, dimension errors, or missing paperwork. The seven signs above – cracks, delamination, fiber damage, voids, dimension mismatches, surface problems, and missing documents – give you a fast way to judge any FRP shipment before it reaches the job site.
Running FRP quality inspection on every batch, not just the doubtful ones, keeps installation delays and repair costs off your project. Before your next order, choose a supplier who can show documented quality-control records and inspection reports for every part they ship.
Frequently Asked Questions
Q1. How do you check FRP quality before installation?
Check the surface for cracks, inspect the laminate for delamination or voids, examine the fibers, measure the dimensions, check the gel coat finish, and confirm the paperwork matches the specification.
Q2. What are common fiberglass defects?
Cracks, delamination, exposed fibers, voids, resin-rich patches, incorrect dimensions, and poor gel coat finish are the fiberglass defects inspectors flag most often.
Q3. How can you identify FRP delamination?
Look for blisters, bulging, soft spots when pressed, or visible gaps between layers at the edges. For structural parts, confirm with an NDT method such as ultrasonic scanning.
Q4. What documents should be checked before installing FRP products?
Ask for material certificates, test reports, dimensional inspection records, batch identification, and compliance documents for the standard that applies to your project.